Making Jess Brown Rag Dolls & Their Clothes

jessbrown10
My finished dolls, Claudia (right) and Olivia (left) got to hang out on my chair before I sent them off into the world.

For my birthday last year, my Sister got my a copy of The Making of a Rag Doll by Jess Brown. Jess Brown is an extremely talented and well regarded doll-maker whose work is sold by her own websiteLand of Nod and other high-end stores. While nominally for children, her dolls are highly sophisticated and transcend that market. (You can listen to a great interview with her from the While She Naps Podcast.)

jessbrown2
My original dolls on the left had no noises and their hair was craft felt that I pinned in place. Jess Brown’s book is on the right.

They are also very distinct. Once you see a Jess Brown doll, than you immediately know it is one of her pieces of work and her style has influenced a lot of other doll-makers. I feel like I see “Jess Brown-esque” work all over the handmade doll world.

When I sewed these two dolls from her pattern, I actually had to sew three bodies, because one arm tore off while I was trying to turn it. After stuffing, I did a version of Jess Brown’s distinct star shaped eyes and cut up some felt for hair. My two annoyances at Jess Brown’s book are that there are not really any instructions for hair and that the patterns are printed on green ink on brown paper. I had to take them into work to get a decent copy of them for cutting up.

Anyway, I pinned their hair on and stitching them up some bloomers and then… well, sadly, then they sat in a box for over a year.

Needless to say, I finally got my act together and started working on them in late April after I finished my baby gifts.

jessbrown7
All the fabrics I first selected were based on the dark grey patterned fabric in the center. I did not end up using all these fabrics.

I pulled out my fabrics, sorted through my stash, and put together a collection of fabrics I liked for a wardrobe. I based my selections off this wonderful grey floral fabric from Cloud9 that I found at Joanne’s (the only place locally that carries Cloud9, sadly). I added fabrics to the collection as I realized I didn’t have enough of some of these to make a whole dress and had to adapt to my smaller amounts. (The book said that a 1/4 yard cut was enough to make a dress, but I found it was JUST shy of the pattern if you were following grain lines.)

jessbrown11
The whole wardrobe of dolls was based around the grey floral fabric. Each doll also got two bags.

I don’t remember what my original plan was (it has been a year), but my “new” plan was to make the dolls three or four dresses, two or three pinafores, at least one coat, a second pair of fancier pantaloons with lace trim, and some bags. I discovered how much I loved applying ric-rac to basically everything and happily applied it to the red bag above in two stripes.

Most of the clothing patterns in the book are not hemmed, but rather use stay-stitching. I have written a poem about how I feel about exposed stay stitching:

I do not like stay stitching, Sam-I Am. 
I do not like it in a box. I do not like it on a fox.
I do not like it on my doll. I do not like it at all.
I do not like how it looks. I do not think it belongs in books.
I do not like it on a dress. I think it is a mess.

Thank you.

But all joking and poetry aside, what I respect about Jess Brown, and all my favorite dollmakers/soft toy designers, is that there is no doubt that her work is her work. From sewing her dolls with dark thread that shows when they are stuffed to visible stay stitching, Jess Brown has a distinct style. All of her choices are specific. I do not believe Jess Brown uses stay stitching, because she can’t roll a hem. I believe she uses it, because she has made an artistic choice. And I respect that, even if when I made a doll from her patterns, I am going to make a different artistic choice.

That’s the thing about patterns- they are a place to start, not a place to end.

jessbrown3
On the left is Olivia (the blond doll) and on the right is Claudia (the brunette).

I re-stuffed both dolls eventually and made their hair by hand stitching on squares of wool-blend felt. Originally, both dolls were gong to have pigtails, but I actually really liked the short hair look, so I left them off the brunette. Hand stitching the felt hair onto the dolls heads took all one evening while I watched TV. I used DMC floss to match the felt. I wanted the hair to be clearly handmade without looking sloppy.

Jess Brown dolls don’t have noses, but I think dolls need noses.

So, eventually, I gave both my dolls noses using thread. I actually really like the way the noses turned out and I want to try this technique again in the future.

Sewing up the doll clothes was totally addictive. Nearly everything was three pieces or less. No tiny sleeves to set in. No waist bands to attach. Everything was simple and I found, to my surprise, that I loved the simplicity. This surprised me. In paper dolls, I like complexity. I really thrive on tiny details, but while working on these dolls, I found I enjoyed the simple shapes that really let wonderful textile patterns shine.

jessbrown1
Process photos working on the doll’s clothing.

Since the dress pattern was that it was just three pieces, it became a canvas for pockets (on the grey dress), lace trim (the flowed grey dress) and a pleat in the front. The only dress I was frustrated by was the pleated front dress. I struggled to get the bottom curved him to lay flat an the pleat should have been deeper than I made it. Oh well.. You live and you learn.

Each doll got two coats and two pairs of bloomers. The bloomers were a little hard to make, because of the dolls very wide and long hips. The body is triangular and that makes the proportions for pants a trifle odd. Still, my mother taught me all dolls need underwear.

jessbrown5
On the left, you can see some of Jack the Seam Ripper’s handy work. On the right is a button covering a snap.

I didn’t end up using Jack the Seam Ripper a lot, but the curved hems on some of the clothes did give me some trouble. You can see some of my work in the picture above.

One of my favorite tricks is to cover snaps (which I think always look messy when I sew them on) with a button. I bought a big pack of these thin cheap shell buttons. Some were really warped, so I had to shift through them. I tried to pick out buttons that were “old fashioned” without feeling too old fashioned, if that makes any sense.

Part of this process wasn’t just about making two dolls for two people I love. It was also about trying out new things and doing something out of my comfort zone. I wanted to see what would happen if I made a Jess Brown doll, even though I am not a huge Jess Brown doll fan. I wanted to see if I could adapt this style into something I loved.

And I needed to figure out what I loved. What did I like in a cloth doll?

I’m beginning to learn it is very different than what I like in a paper doll. That’s okay though- it is part of the process.

jessbrown9
Claudia with her entire wardrobe was sent off to my Sister.

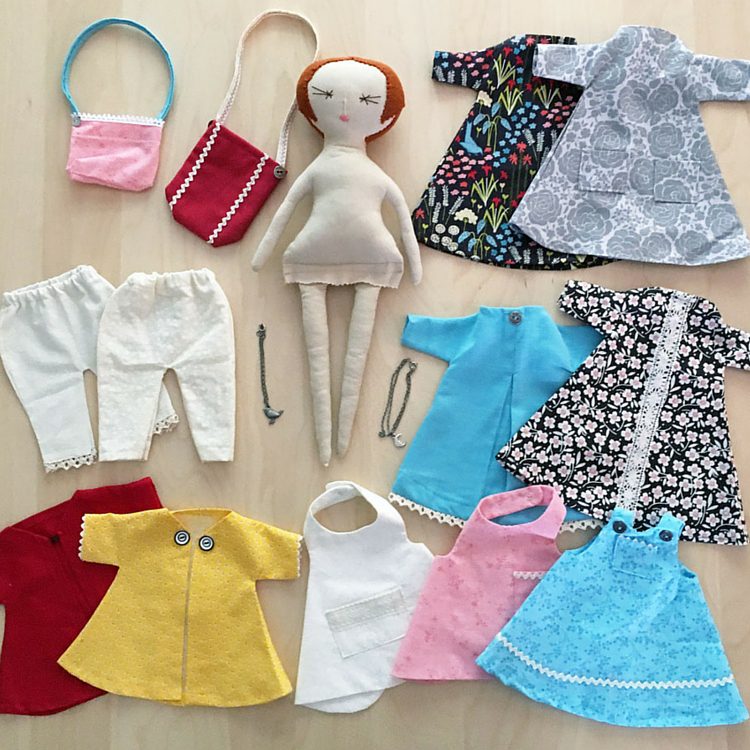
In the end, each doll ended up with two pairs of bloomers, two coats, four dresses, two bags and three pinafores/aprons. I also made two little necklaces out of some chain and charms. Nothing really fancy, but I thought they needed some extra accessories.

Claudia’s blue dress ( I think of as her “fancy” dress) has an interior facing pleat. She has blue, pink and cream pinafores, along with a red bag with ric-rac and a pink bag trimmed in lace. Otherwise, her wardrobe is identical to her sister, Olivia.

jessbrown8
Olivia with her wardrobe. She was sent to my Mom.

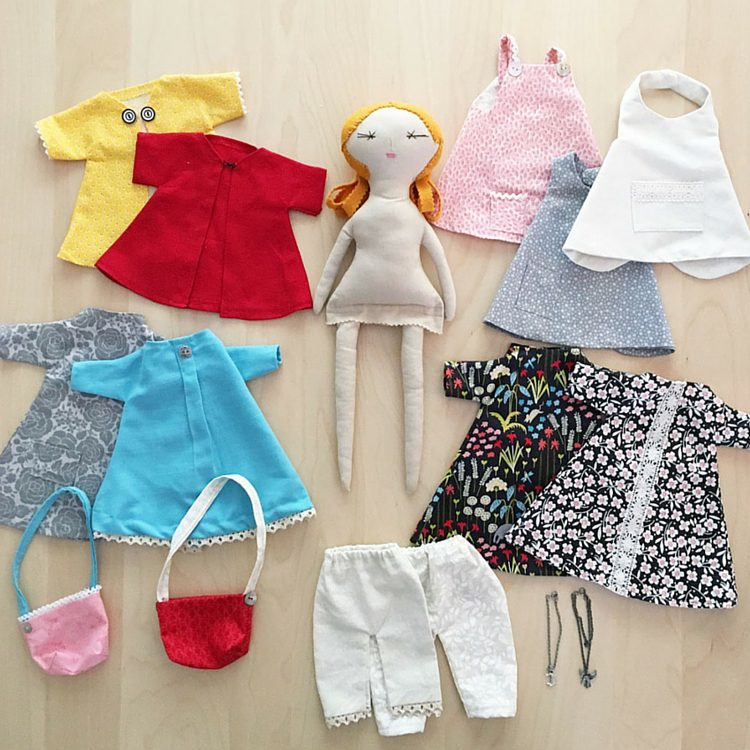
Olivia’s “fancy dress” has an exterior pleat. She has a grey, a pink and a cream pinafore. Her bags are also pink and red, but the red one is made from a different fabric. Otherwise, her wardrobe is identical to Claudia’s wardrobe.

My mother’s reaction to her was to remark that her feet looked very cold without any shoes. So, I recommended she knit her some socks. I don’t knit, but my mother does.

I have to confess, I sort of had to stop myself. I was completely ready to make them even more dresses and even more bags and other things. Still, at some point one has to declare a project “done” and I think 36 outfit combinations is enough. 🙂

jessbrown6
Playing dress up with them before I sent them off to their new homes.

I thought I would close with a few photos of me playing dress up with the girls.

Next doll project is going to be one I can share IN PROGRESS and then I won’t end up with a post this long at the end. So, no surprises for anyone anymore.

Things I still need to work on include being able to backstitch without ending up with a nest of thread (though this stopped somewhat when I sorted out my tension), doll hair attachment and stuffing. Stuffing is something I need to get better at.

Thoughts on my latest creations?

A Pair of Lovey-Doveys: Thought’s on Sewing Up These Baby Gifts

So, in my last pattern review, I made a teddy bear for my sister. I also whipped up two of these little Lovey-Doveys, also designed by Abby Glassenberg.

(I swear I sew patterns other than hers, but I have been in full on ‘baby gift’ mode.)

While I made these on Sunday after making my Teddy Bear, I wanted to post about them separately, because they are a totally different pattern.

And now, onto the review…

bear-bunny-lovey-dovey
All the pieces cut out and waiting on the table to be sewn up.

Time to Complete: About 2.5 hours (I made two and did them over three days, so I’m not positive on the time investment.)

Number of times I pulled out “Jack the Seam Ripper”: 2

I made a bunny and a bear “Lovey-Dovey” or “Blanket Animals”. I bought a set of Lovey Dovey patterns from Abby Glassenberg Designs like last year in the deluded belief I would make them for a co-worker’s grandchild. Obviously that didn’t happen.

When I was at Hancocks for their clearance sale, the pattern (Simplicity 1681) was on-sale (Abby licenses some of her designs to them) for a very reasonable price. So, I picked it up for the bear pattern and also used it for the blanket animals rather than printing out my pattern, because I am lazy and was out of printer ink.

Clear as mud? Lovely.

lovey-dovey-collage-2
Picking out fabrics and cutting out an ear. I live dangerously and cut out my tissue paper patterns.

So, anyway, since the parents have decided not to know the gender of the baby, I picked up neutral fabrics for the ear linings. I probably could have raided  my stash, but why waste a good excuse to buy fabric, especially sale fabric?

I didn’t want to do a classic white bunny, since that seems like a bad idea given that babies are messy little creatures, so I instead I went with some grey fleece for the bunny and light brown fleece for the bear. I didn’t want to make both critters out of the same color fleece.

I love how the bunny and the bear turned out. 

lovey-dovey-collage
The back of one bear showing off his tail and my bunny with his adapted tail.

When with cutting the back of my first teddy bear and then inserting the tail, I somehow didn’t catch all the layers when I sewed it up again afterwards and had to fix it by hand. However, it worked much better the second time I tried (practice works!) and so the Lovey-Dovey bear tail came out well. The pattern called for using pom-pom for the bunny tail, but since I don’t like pom-poms, I gathered a circle to make the tail.

Uses of Jack:

Jack came out twice for this set. First, I attached one of the bunny ears to the wrong side of one of the head pieces and it had be to removed to re-attached. I also messed up while hand sewing on the bears ears and out came Jack once more.

He’s a good little seam ripper.

But, all things considered, Jack hasn’t gotten to spend much time out of his box this time. I say this, but I know that soon enough Jack with make a reappearance. (He always does.)

Final Thoughts:

According to Abby’s blog, While She Naps, her Lovey-Dovey patterns are her best sellers. I can see why.

They are fast and so cute. I want to make more of them. I want to make a whole menagerie of little blanket animals for every baby I know and possibly for babies I don’t know.

And I love that by just switching out the head and the tail, you can make a new creature. Once you figure out the process, it’s pretty fast.

I did all the machine sewing for both creatures and then sat down with some Netflix to embroider the faces and attach the the heads to the bodies. I tend to work tyhis way, doing the machine work and then in the evening or the next day, doing the handwork. It’s funny, when I create paper dolls I work the same way. I ink a bunch, than I scan and bunch, than I color a bunch. I guess I just like working in batches. 

So, I highly recommend this pattern, but I would buy it direct from Abby Glassenberg Designs (unless you too have a Hancock that is closing near you), because I think her photo instructions are SO much better than the ones in the Simplicity package which confused me in a few places. (Ear attachment, for one.)

bear-bunny-lovey-dovey-5
My finished bear and bunny. By the time I got this photo, it had gotten dark.

She also has this great video on how to ladder stitch that I watched before I started. Technically, I have ladder stitched before, but it was a nice reminder and I think I did better after watching and it was linked in her pattern, or I wouldn’t have known it existed.

Has anyone else made a Lovey-Dovey?

Next, I’m working on some cloth dolls by Jess Brown. Also a gift, so taking notes while I sew and I will share them once they have been mailed off.

And after that… Well, I haven’t decided, though there is a replacement bear to be made.

My First Teddy Bear: A Review of Simplicity 1681

Time to Complete: 3 hours

Number of times I pulled out “Jack the Seam Ripper”: One

I wanted to make a quick fun baby gift for my Sister and Hancocks was closing. So, I popped in to check out the sale and picked up Simplicity 1681, designed by Abby Glassenberg, at a pretty good discount. I’ve always admired her soft toy design and her blog, “While She Naps.” So, I was really pleased to get the pattern and get to try it out. Plus, I wanted to see the differences in directions between her self published work and her licensed work. That way I would know in the future if I wanted to buy the Simplicity versions or directly from Abby.

Confession- I finished this guy in April, but didn’t want to post about him until he was in the hands of my Sister. Nothing worse than your sibling learning about her baby gift from a blog before the gift arrives.

I’ve never made a bear before, so I was pretty nervous. I think the small size was particularly challenging. Somehow, I didn’t notice that the pattern said the bear was only 12 inches tall. Tiny little guy.

I picked up some dark brown fleece and some quilting cotton to line the ears with. Since my Sister has decided not know the gender of her baby, I picked out fun striped fabric that could be for a boy or a girl.

Brown and colorful striped quilting cottons for the teddy bear I made from Simplicity 1681.
Picking out gender neutral baby fabrics is actually pretty tough.

There’s a step in the pattern where you fold in all the limbs and sew on the back of the body. That would have been easier if I had noticed that the directions said to “lightly stuff” the limbs. Opps.

After that, you tuck the head into the neck-hole and sew around the neck to attach the head. I looked at that and thought, there is no freaking way I am managing to sew that on my machine. I am just not that good.

So, I hand back-stitched the head to the body instead. I hope it’s secure enough. This is for a baby after all… but my sister can sew so I’m sure she can fix it if there is a head related mishap. Teddy bear decapitations ruin everyone’s day. (I wrote this before I found out what eventually happened to the bear… I can proudly say the head did not come off.)

Also, working with polar fleece is a dream. I’d never done it before, but it has no grain. It doesn’t ravel and it is pretty resilient to seam ripping. The only problem is that Hancock had a 2 yard minimum on their fabric cuts (since they were closing). Now, I’ve got A LOT of brown fleece. So, much that I could make an army of bears. Since I mostly sew doll clothes and dolls, I don’t know what I’ll do with 1.5 yards of left-over fleece.

Occurrences Of Jack the Seam Ripper:

Just one actually, which was kinda shocking. The first time I tried to embroider the face, I was copying the design on the envelop. It’s cute, but I wasn’t keen on how it looked when I did it.

I am not a smiling stuffed toy kinda girl. (Not shocking to anyone whose seen my paper dolls…)


A photograph of the embroidery on the face of my teddy bear head.
My redone face and my messy dining room table where I sew.

So, I tried to take out the embroidery with Jack, but ended up cutting a hole in the fleece. It wasn’t hard to stitch up a new face and try again though.

While I didn’t use Jack much, I did have to actually secure a fair number of things by hand. So, I used my sewing needles and thread more than Jack this time.

A back and front views of Simplicity 1681, a teddy bear pattern designed by Abby Glassenberg.
Here’s my finished bear and look, he has a cute tail. And I really should have given him a once over with the lint roller before photographing him.

Final Thoughts:

Pretty much all my problems came from the small size and my errors- not issues with the pattern design. Despite a few struggles I still ended up with a pretty darn cute bear!

I’d recommend this pattern to others who have never made a bear before. It was a bit more complex than I was expecting, but not absurdly so. That head attachment though… you gotta be kidding me.

I’ll also admit that I judge a good pattern by how much I want to make it again. I don’t think I’m desperate to make another bear, but if there’s a baby shower I need a gift for, a bear would be an easy one. I’m pleased with the results (though he is a little wonky) and I am so glad to get to send him off too my Sister.

You can pick up the pattern direct from Abby Glassenberg or from anywhere Simplicity patterns are sold. I would buy it from Abby, since I did decide I liked her photo directions better than the Simplicity directions.

An Epilogue:

teddy-bear-dog-attack
Poor bear.

So, I wrote up this post, scheduled it and then got a phone call from sister informing me of “horrible news.”

My mind immediately went to family disaster of some sort. Fortunately, no one human was in the hospital.  It turned out that her Sweet Dog and the Other Dog she was house sitting got their paws (or teeth, really) on the bear while she was showering. When she emerged, the dogs had torn up the teddy bear beyond repair.

After I finished laughing at the image of Sweet Dog enjoying the bear and she finished blaming it all on the Other Dog, I promised I would make another bear for her as soon as I could.

So, I guess I’ll be making my second teddy bear much sooner than I thought. Time to go cut some more fleece.

Also, I can safely add to my review that while the teddy bear was enjoyed by the dogs, it did not fair very well structurally, so I would not recommend it as a chew toy.